Overview
The Web+Center suite of applications can provide all of the business tools necessary to process a customer support request into a billable/quotable project which can be approved by the customer and eventually invoiced. The various steps and functions of Web+Center to perform this kind of work flow are outlined below.
Step 1:
Customer submits a support request ticket using the Customer+Center interface. In this ticket, they will define the particular project. Some interation may occur between the customer and tech to clearly define the scope of the project.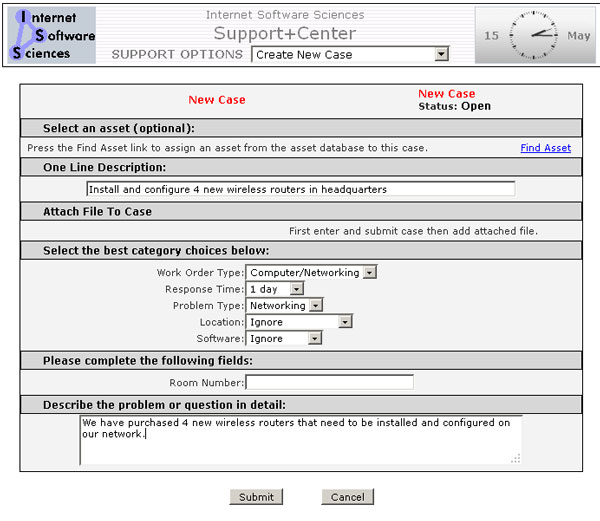 Figure 1 – Original Customer+Center case form defining original projectStep 2: Figure 1 – Original Customer+Center case form defining original projectStep 2:
Tech support reviews the work order request and clarifies the scope of the project with the customer. A time and cost estimate is then entered in the Extended Time Spent Billing area of the Tech+Center case form.
 Figure 2 – Extended Time/Spent form area in Tech+Center case form.Step 3: Figure 2 – Extended Time/Spent form area in Tech+Center case form.Step 3:
As part of the customer update notification email, the Customer+Center ticket provides an option to approve and/or comment on the work estimate. This approval process allows the logged in customer to authorize work to be completed, and this authorization is placed into the case history record for that support case. A special customer setting must be set for the customer to have the Time Spent and authorization button and form appear on the customer support ticket and notification messages. This setting is configured in the customer edit form in the Tech+Center application with the Time and Billing Record option. It should be set to Customer Authorize and Tech View. System wide settings for this feature can be customized by editing the codecustomizations.inc file in the language directory.
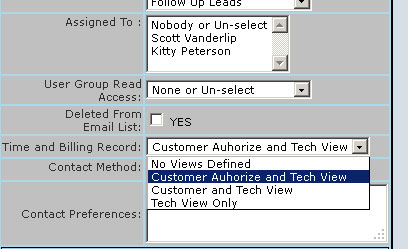 Figure 3 – Options in the customer record to define whether the time spent information is displayed for the customer.Once the customer clicks on the Login link on the email notification, the Customer+Center case page outlines the Time and cost estimate and options to approve (sign and date) the work estimate. The customer can approve (digitally sign), date, and notate the estimated time and costs. This approval by the customer is then entered into the case history record for documentation. Figure 3 – Options in the customer record to define whether the time spent information is displayed for the customer.Once the customer clicks on the Login link on the email notification, the Customer+Center case page outlines the Time and cost estimate and options to approve (sign and date) the work estimate. The customer can approve (digitally sign), date, and notate the estimated time and costs. This approval by the customer is then entered into the case history record for documentation.

Figure 4 – Customer+Center case form display the time spent billing information with button to Authorize work.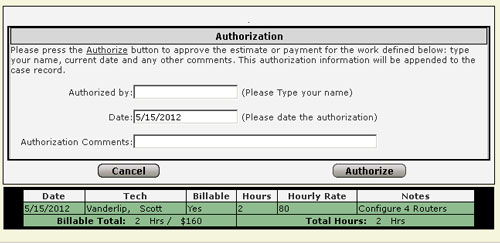 Figure 5 – Authorization Pop up with options to sign, date and add any notesStep 4:
Once the customer approves the time and cost estimate, the work can be completed by the technician and the case closed. An payable invoice can then be created in the Business+Center for the time spent information entered into the Tech+Center case form.
To create the invoice from the Extended Time Spent Billing Information:
- Navigate to Business+Center from the Tech+Center by clicking on the Business+Center button
- Click on the Invoices button
- Click on the Create New Invoices from Time Spent Records
- Enter the desired date and billing grouping options
- Check which invoices you want to create and press the Submit button.
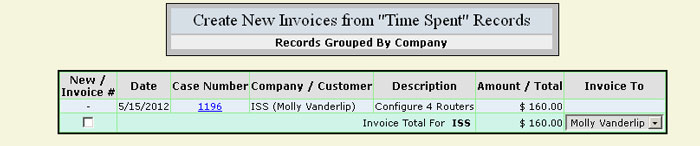 Figure 6 – Creating invoice in Business+Center from Extended Time Spent RecordsStep 5: Figure 6 – Creating invoice in Business+Center from Extended Time Spent RecordsStep 5:
Review the invoice and add any addditional cost/quantity to the invoice before emailing the invoice to the customer. The invoice business address and logo that is sent out with the email invoice can be customized.
The whole layout of the invoice is defined in an include file called PrintInvoiceTemplate.inc located in the Language directory. This file is designed to be customized for your particular business requirements. Any HTML or other customizations will be changed for both the print invoice option and the invoice that is emailed.
In the upper left hand corner of the invoice is your business or organization or “Bill To” address. This remit address must be configured by editing the PrintInvoiceTemplate.inc file in the language directory.
 Figure 7 View of printable or emailed HTML invoice. Figure 7 View of printable or emailed HTML invoice.
Also, the invoice contains a default company graphical logo that is designed to be replaced with your own graphic. The file calledInvoiceLogo.jpg located in the language subdirectory should be replaced with your own graphical logo file. To fit the layout of the invoice page, it should be similar dimensions of 300 pixels wide by 100 pixels tall.
Step 6:
Once the invoice is in the system, you can run other accounting and billing reports by customer and company to provide various accounting functions. Clicking on the summary link after a customer search in the Tech+Center or Business+Center will provide information about all cases and invoices associated with that customer.
Conclusions:
The steps above demonstrate a very simple, single work order/extended time spent billing project and invoice. Using the new Web+Center Version 7.5 Project features, you can handle larger projects with multiple tickets, each containing multiple time spent and hourly estimates and approvals. Please contact Internet Software Sciences if you have additional questions on how to more effectively use Web+Center to handle more of your business processes. |