Overview
One useful feature of the Web+Center help desk is the ability for customers and technicians to upload and share file/documents with the case ticket form. This feature must be separately enabled and a separate physical directory and virtual directory must be defined to fully configure this feature. The file download/upload option takes a specified file from a browser based file viewer and then renames the file by appending a “C” + Case number to the file name to create a unique file name that is then placed in the specified download directory on the server. A link is then added to the case history with this unique file name so that file can be accessed by the customer or technician anytime in the future.
The files are stored in the regular file structure so one should choose a file directory/drive that has sufficient capacity for the downloaded files. To allow for easy retrievial of any type of the file and to prevent the webserver from executing scipts or executables, the virtual directory permissions for the download folder should have only READ permissions Instructions for configuring the file download feature can be found in section 3.8 of the Web+Center User guide in the section called: How to configure File Download options for the Customer+Center and Tech+Center . For convenience, these are outlined below:
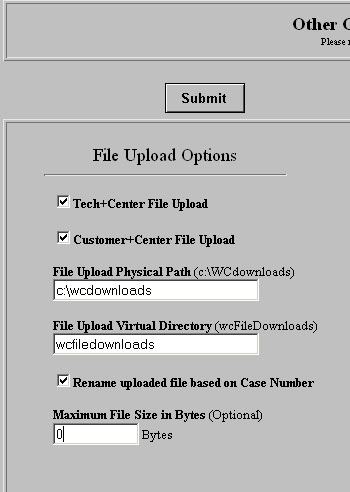
Figure 1 – File Upload configuration on Other Configuration page
- Step 1: Enable file upload option for the Tech+Center and or/Customer+Center:
- Click on the Administration button in the button panel.
- Click on System Configuration Menu link.
- Click on Other Configuration link.
- Under the File Upload Options check which application (Tech+Center or Customer+Center) to enable which application you wish to allow users to upload files.
- Step 2: Enter the name of the physical file folder path that you must have previously created separately. An example of a valid folder path might be “c:\wcdownloads”.
- Step 3: Enter the name of the virtual directory that points to this folder you just specified. This virtual directory must also be created separately. A valid virtual directory might be “wcdownloads”
- Step 4: Check the Renamed Uploaded file based on case number option to create unique file names.
- Step 5: Specify the maximum file download size. Place a 0 into that field to allow any file size.
- Step 6:Press the Submit button to commit these changes.
- Step 7: Using Windows explorer, create the folder you specified in step 2. Set the file security permissions for this folder for “everyone” with full control with no other users. It may be necessary to reboot the machine to have these permissions apply. Besure that any inheritance of security permissions from a higher level directory is also removed if needed.
- Step 8: Create a virtual directory with the virtual directory name specifed in step 3. IMPORTANT: Set the Access settings for this virtual to be READ only! (see below).
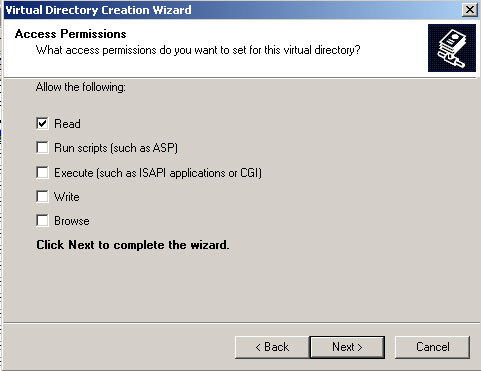
Figure 2 – IIS Virtual Directory Application Settings screenshot - Step 9: The file download option icon
 will appear in the upper right hand corner of the Tech+Center ticket form. The customer form will have a text link. An initial submit of the case ticket must be first done to obtain a case number before a file can be downloaded and renamed based on the case number. There is no limit to the number of files that can be uploaded per ticket, but only 1 file at a time can be uploaded.
Other Notes:
Depending upon your webserver version and various installed Norton or McAfee anti-virus products, you may experience problems that are outside of Web+Center environment but still fixable. Our FAQ knowledge base includes articles on:- Operation not Allowed’ error with files over 200K on Windows 2003 Server
- Norton Anti-Virus and Mcaffee Antivirus script blocking/disable features