
Creating Custom Work Order Requests
A custom work order request form, such as a New Employee Badge Access Request Form, can be created by taking the existing Customer+Center generic case form and customizing it with the new fields and adding the new form data into the existing Web+Center case fields for regular processing and dispatching by support staff.
To make this customization fairly easy to implement and without requiring additional database fields, the form will prompt users for specific fields, but all of the special form entries will simply be added to the case history field as text rather than attempting to store and fetch all of the form items as individual database records. This greatly simplifies the whole customization by not touching the database or any of the other case processing features of the Web+Center Software.
Listed below are the basic steps to create your own custom forms. All of the files mentioned in this article are now available with the Version 5.0 download or you can grab individual files from our version server. The Customer+Center Version 5.0 latest files can be obtained by visiting the Version 5.0 Customer+Center Files page.
- Step 1: Create your custom form based on your requirements. A new file was created called CustomCaseForm1.asp. This form is a New Employee Badge Access Request form. (Figure Below). As mentioned above, the form elements naming convention used for the form field allow for some easy processing later. To enable generic processing of the form elements, we have named all of the form elements with a starting the phrase “custom” which we will parse out during processing. For example, the radio button form element for Employee_Type is defined in the HTML syntax as: <input type=radio name=CustomEmployee_Type value=”New Hire” > New Hire The “Custom” phrase will be used to find this form element and the underscore will be removed before we add the field name to the history field.
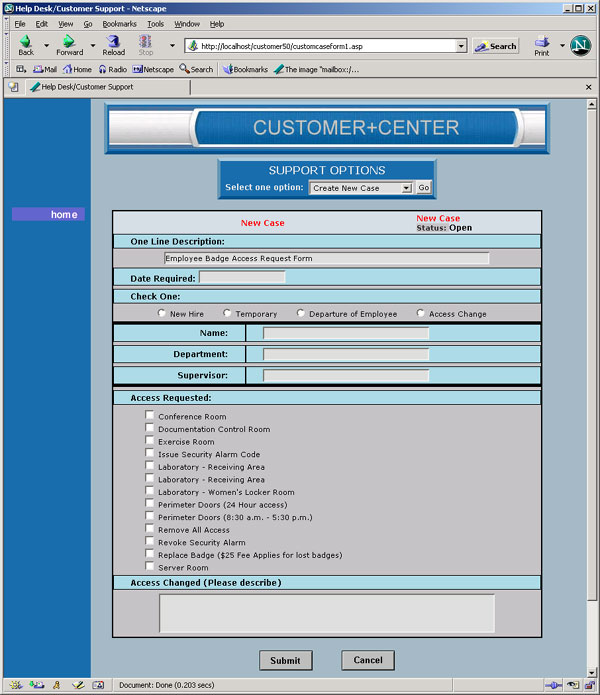
Figure 1-1 Example New Employee Badge Access Request form
- Step 2: To process this form, a special case submit module was created. This was created by taking the existing Customer+Center case submit module (DoCaseForm.asp) and copying and pasting/renaming the file as DoCustomCaseForm.asp. By using the existing Customer+Center case processing module, it will automatically include all of the e-mail notification options for customer and techs and groups and it will properly set all of the case time and date and default fields as needed.The one additional step we will need to do is to grab all of the new custom form fields and place the information into the Case history field. To do this,the following bit of code was added to read in HTML form element that start with the phrase “custom” and to use both the field name and the form element value and place it into the case history field. For example, if this routine finds a form element called “customConference_Room”, it will take that form element and it’s value and create the text entry Conference Room : YES and add it to the case history. The “custom” phrase part is removed, the Conference Room underscore character is replaced by a space and the value is obtain using the Request.form ASP object. This code is outlined in the figure below.
|
- Step 3: To call this module, a new drop down entry was added to the Customer+Center Option list that appears on every Customer+Center page. The code that displays the Customer+Center drop down choice options are defined in the CCHeader.inc file. The following set of lines of code were added to the CCHeader.inc to provide options to call these custom forms as part of the drop down choices. Each of these customizations listed has easily configurable options to enable or disable the custom form code by setting a variable called CustomForms.
Sample Code in CCHeader.inc file
| IF CustomForms = 1 Then If Action = “Employee Badge Access Request Form” Then response.write “<option SELECTED>Employee Badge Access Request Form</option>” Else reponse.write ” <option>Employee Badge Access Request Form</option>” End IfIf Action = “IT User Request Form” Then response.write “<option SELECTED>IT User Request Form</option>” Else response.write “<option>IT User Request Form</option>” End If End If |
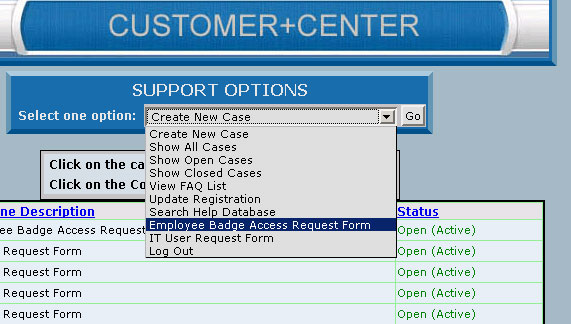
Figure 1-2 View of Customer+Center Choice list
In addition to displaying the option in the Customer+Center Drop down list, a few lines of code must be added to the DoCustomerOptions.asp to process that selected choice.
New additional checks added to DoCustomerOptions.asp module to call the custom case forms include the code:
| <% elseif Action = “IT User Request Form” Then %> <!– #include file=CustomCaseForm2.asp–> <% elseif Action = “Employee Badge Access Request Form” Then %> <!– #include file=CustomCaseForm1.asp–> |
Code Modifications to DoCustomerOptions.asp file for custom forms
- Step 4: When a customer submits a custom work order request, the data is then added to the case history field of the case and can be processed by support staff. All of the standard email notifications are sent out to the default groups and associated techs. From this point forward, it can be processed as a normal case from either the Tech+Center application or the Customer+Center application. The data inputted by the customer will appear in the Tech+Center case form view as:
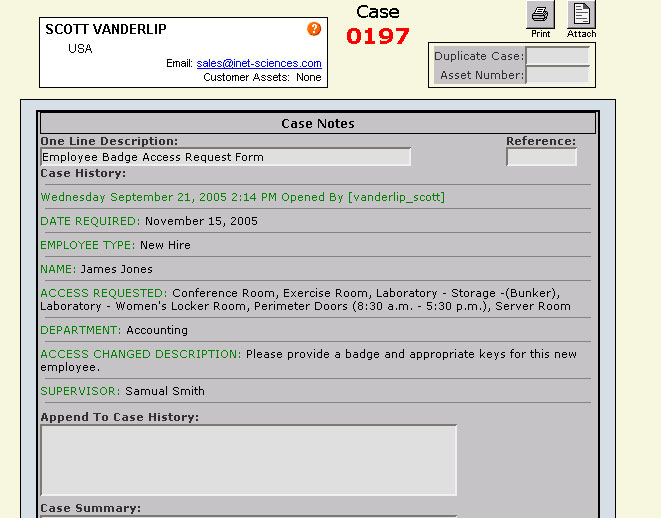
Figure 1-3 Tech+Center view of custom form data in history field.
- Step 5: Taking this same model, several custom forms can be created for specialized work order that require additional specific information for ordering or processing. This Web+Center customization allows this functionality to be added without adding additional fields to the database or creating new SQL queries to access the data or requiring other changes to the system. Contact ISS or the ISS consulting group if you have any additional questions.
| File Directory | File Name | Notes |
|---|---|---|
| customercenter | ccheader.inc | common Customer+Center INC module that contains the Customer+Center dropdown menu code |
| customercenter | DoCustomerOptions.asp | Code that processes the Customer+Center drop down menu code |
| customercenter | customcaseform1.asp | ASP module to display the custom case form in the Customer+Center |
| customercenter | DoCustomCaseForm.asp | Submit Module for the custom case form |
Printing and Emailing invoices with the Business+Center
The Web+Center suite of web-based applications includes a component often overlooked by support operations. The Business+Center application is primary designed for the Sales/Contact Management user but starting with Version 5.0, it includes a mini accounting/invoicing, sales and quotes tracking system.
As of September 22, 2005, the shipping version of the Business+Center has been upgraded to include some functionality to create printable invoices and the ability to email HTML based invoices to customers. To upgrade your current Business+Center version 5.0 software with this new functionality, refer to the list of files to upgrade at the end of the article.
Invoices can be created by manually creating an individual invoice, or there are options to automatically create new invoices from “Time Spent” Records or to create renewal invoices.
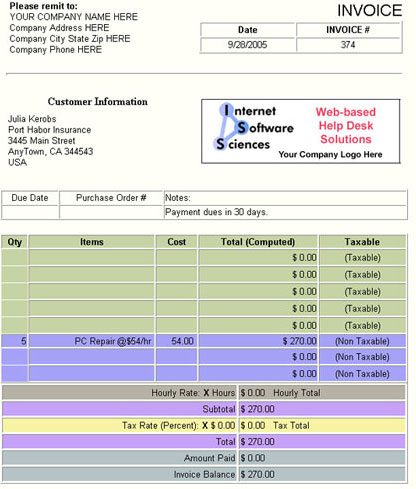
Once an invoice has been created, the invoice can be printed or email using the Print and Email icons in the upper right (figure 2-1 below) and portion of the screen.
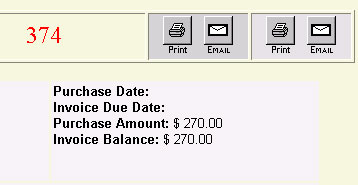
If you want to add additional notes to the invoice or email the invoice to another user other than the recepient, then use the two icons on the right where you can override the email address and default reply to addresses and add additional notes.
Invoice Customizations
The invoice layout is designed to be customized by organizations. The whole layout of the invoice is defined in an include file called PrintInvoiceTemplate.inc located in the Language directory. Any HTML or other customizations will be changed for both the print invoice option and the email that is emailed.
In the upper left hand corner of the invoice is your business or organization or “Bill To” address. This address must be configured by editing the PrintInvoiceTemplate.inc file in the language directory. Once this is completed, the invoice can be printed and used in 2 window envelope.
Also, the invoice contains default company graphical logo that is designed to be replaced with your own graphic. The file called InvoiceLogo.jpg located in the language subdirectory should be replaced with your own graphical logo file. To fit the layout of the invoice page, it should be similar dimensions of 300 pixels wide by 100 pixels tall.
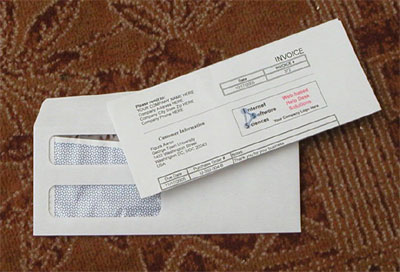
When printing the invoice, it maybe necessary to set the browser print options that control whether a URL and pages numbers are printed on the top of the page as well as the top and botton margins. Different browsers have different print options so it is best to experiment with browser print options to find the optimum setting that lines up address and return address information in the envelope windows if you want to use them.
Version 5.0 Files
To Upgrade to enable printable invoices and email invoice options if you already have a 5.0 system installed, grab the files listed in the table below. The latest Version 5.0 files for each directory can be found by clicking on each of the links below.
| File Directory | File Name | Notes |
|---|---|---|
| businesscenter | Invoice.asp | Main Invoice ASP form module |
| businesscenter | PrintInvoice.asp | 2 step print invoice ASP module |
| businesscenter | DoPrintInvoice.asp | Single Step Print Invoice Module |
| businesscenter | EmailInvoice.asp | 2 step process to email invoice to customer |
| businesscenter | DoEmailInvoice.asp | 1 step process to email Invoice to customer |
| Language | letterimage | Replace this graphic with your own company logo |
| Language | email.gif | Small button graphic for emailing invoice |
| Language | print.gif | Small print button graphic |
| Language | PrintInvoiceTemplate.inc | This file is used to create the HTML invoice that is used for emailing or printing. Customize this module if you wish to customized the invoice layout. |
Leveraging the Web+Center suite of applications for your business
 Putting the pieces together…Web+Center functionality has grown well beyond it’s original help desk functionality and it’s sales, business and support functionality is now being used in different departments of a company in a integrated and collaborative maner. Listed below are some ways that the Web+Center suite of application could be leveraged in your company or organization.
For the right company the Web+Center Suite can…
- Store the initial sales leads and sales contact persons can track sales leads, provide sales quotes, take customer notes and assign customer leads to other contact reps or organize the customers into customer categories, or schedule meetings with customers and contact reps using the calendar features. These functions are best handled using the Business+Center application.
- After a sale, the Help Desk (Tech+Center) can use the same customer database and allow for customers to create and update their own support cases as well as look at knowledge base articles and frequently asked questions (Customer+Center).
- Customer sales can be tracked and invoiced using the Business+Center invoicing component and invoices can be printed or email to the customers. Reports determining sales and quotes can also be created once invoices and quotes are entered in the system.
- Combining all of these functions using a single application and common customer database has many advantages including better customer long term relationship by tracking them everystep including pre-sales, support and purchasing options.
Collecting support costs from customers
Many companies that provide support do not properly bill for the time spent on a customer due to the difficult task of tracking support time and resources accurately and then billing the customer.
With Version 5.0 and the Extended Time Spent Billing features integrated with the Business+Center invoicing component, support can be provided and billed to the customer.
Recording and tracking assets for customers
Using the asset management piece of Web+Center is another way to combine another piece of the Web+Center into your business process. Many companies use the asset piece as a way to store and track assets or products that are sold to customers. Once the asset is entered, it can then have support issues tracked against it or used for returns or replacements or other functions.
The asset component and its labels and forms are designed to be completely re-configured to fit a company’s product requirements. Additional information on how to reconfigure the asset labels are described in the programmers guide in the documentation directory.
Customizing other business processes into the Web+Center application
For many Web+Center users, the Web+Center application is what we refer to as the 90% solution. Each business is different and requires special customizations to the customer interface, helpdesk and business process area but since the Web+Center is completely customizable and the source code and database architecture is provided and documented, it is easy for companies to move the Web+Center application from the 90% solution to a 100% solution.